
(UPDATE TO ORIGINAL POST: I’ve written more on this subject, and there is now a GUI tool in Visual Studio for applying hotfixes; you don’t need to use the SCDPBundleInstall.exe command line tool. Take a look at Installing Application X++ Updates Still Sucks (part one) and Installing Application X++ Updates Still Sucks (part two) instead of this, and only come back if you feel you still need to use SCDPBundleInstall.exe and you’re having problems. Installing Application X++ updates still sucks, but it does suck significantly less now.)
If you’re reading this, you have probably already tried to install some Application X++ updates you downloaded from Lifecycle Services, and failed. I’m assuming you’ve gone to this page:
https://ax.help.dynamics.com/en/wiki/configuring-and-installing-a-metadata-hotfix-package
…and tried to follow it, and run into one or both of these problems:
(1) As of this writing, the instructions on that page are out of date, and have one or two mistakes.
(2) SCDPBundleInstall kind of sucks. It doesn’t seem to always get dependencies right when the updates stack up, running them in the right order; and in some cases -prepare doesn’t create needed directories, although -install does.
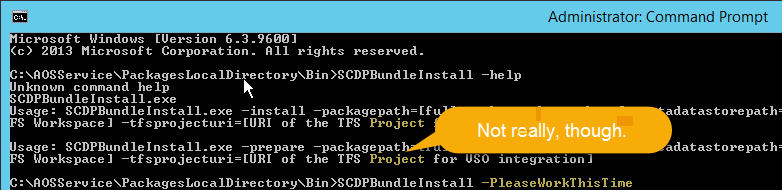
For example, if you included hotfix 3208224, you probably got an error like this:
Could not find a part of the path 'C:\AOSService\PackagesLocalDirectory\AccountsPayableMobile\AccountsPayableMobile\AxLabelFile\LabelResources'.
 at Microsoft.Dynamics.AX.Servicing.SCDPBundleInstall.PrepareCommand.RunCommand()
 at Microsoft.Dynamics.AX.Servicing.SCDPBundleInstall.Program.Main(String[] args)
As such, you need to follow some steps that include a couple of corrections and workarounds. These will get you a good safe changeset to roll back to in source control if things go awry; it will also help make sure you have a deployable package that will install correctly through Lifecycle Services.
After much suffering on my end, I want to save you the trouble, and step you through what to do. This came from my own trial and error, and I haven’t seen these steps laid out anywhere else; if they have been, please let me know so I can link there and/or give credit. If there is a better way, or this gets fixed, please let me know and I’ll update this.
Part I: Prepare your dev/onebox
Step 1: Have the hotfixes
I assume that you have downloaded the package of hotfixes, which is fairly well documented elsewhere (and pretty intuitive anyway). You should have a file with a .axscdppkg extension on your dev/onebox, with a name/folder location that is clear and recognizable. (Do yourself a favor: have a folder where you put all the hotfixes, and create subfolders that include the VM name, date, number of hotfixes, and the text “X++ Hotfixes,” or something similar.)
Step 2: Your dev/onebox needs to be healthy
By the time you’ve done your web searches and gotten here, it might be too late, and your dev/onebox might be messed up. I can’t help you fix it here. Maybe you’re lucky and have a good checkpoint to go back to, and a good point in version control to pull from. I have had to reinstall my dev/onebox, and it stinks; if you do too, then you have my sympathy.
Temporarily, you should probably not have any mapping to your main/production/build branch in your dev/onebox. If you do, strongly consider removing that mapping for now. You’ll probably need to put it back if you are doing branch merges from your box. But, having mapping to multiple branches will probably confuse SCDPBundleInstall; running it will at least take longer, as it creates the same changes in multiple branches.
Step 3: Get version control to a healthy state
If you’ve hoarked your version control, you need to get back to a healthy state, and I can’t help with that. You need to work with someone who understands version control.
This will be easiest/simplest if your production/build branch is up to date and in sync with your dev/working branch. Consider doing a compare before proceeding.
Locally, on your dev/onebox, this will be easiest if you start from a point where you have nothing in Pending Changes > Included Changes. (If you don’t know how to find that easily yet– in Visual Studio, under Team Explorer– you are swimming in the deep end now!)
Step 4: Checkpoint your VM
If you screwed up your dev/onebox before finding this page, you already appreciate the value of frequent checkpoints. If not… be thankful and do a checkpoint now anyway.
If you don’t know how to do a checkpoint, you should probably spend a little time poking around whatever tool you use to manage virtual machines. In Hyper-V Manager on Windows, right-click the VM and choose “Checkpoint.”
Part II: Create the directory structure required to make SCDPBundleInstall -prepare work properly
Step 5: Do SCDPBundleInstall -install
If you are reading these instructions, it’s probably because -prepare failed for you. As of this writing, -prepare does not always create necessary folders, but -install does. That’s why you’re doing all these convoluted steps. As much time as it wastes, we are going to do the -install first solely to get the directory structure created.
This step will take a while, especially if you have multiple branches mapped. Note my earlier advice that you (at least temporarily) remove mappings for anything but your dev/working branch.
Note also that, as of this writing, the syntax of the -tfsprojecturi switch is not documented correctly, at least not on the wiki page noted above. You just use a URL, not a project. Here is some sample syntax (anybody with sufficient WordPress expertise to help me format this better, please comment!):
C:\AOSService\PackagesLocalDirectory\Bin>SCDPBundleInstall -install
-packagepath="C:\AXHotfixes\X++ hotfixes 2017-02-22 (142)\HotfixPackageBundle.axscdppkg"
-metadatastorepath="C:\AOSService\PackagesLocalDirectory"
-tfsworkspacepath="C:\AOSService\PackagesLocalDirectory"
-tfsprojecturi="https://mycompany.visualstudio.com"
If you get an error, try re-running the command, and it might work! This does not seem to do things in the right order, or consistently, and sometimes it runs fine after a retry or two. The important thing is that it eventually completes, creating the directory structure we need.
If you absolutely can’t get this to finish, go back to your VM checkpoint and quit following these instructions. Sorry, but you’re beyond the help I can give here.
Step 6: Undo the file changes via source control
This is where we get tricky. In Visual Studio, in Team Explorer, look under Pending Changes and undo all the Included Changes. Not exclude; undo. We are rolling back the file changes that the -prepare just made. (But give them a once over first to make sure you’ve excluded any active development you still have going. Ideally you don’t have anything outstanding, but we don’t live in a perfect world, or you wouldn’t be here.)
After completing this step, you should be at a point where the directory structure you need for the hotfixes has been created; but none of the files have been changed.
Step 7: Copy the directory structure
We want to take a copy of just the directory structure (the files inside would be overkill), which we can effectively do with this command:
C:\AOSService\PackagesLocalDirectory>xcopy * "C:\PLDstructure" /T /E /X /I /H
If run this in your packages folder as shown, this is going to copy out JUST the folder structure, with no files, to C:\PLDstructure. Adjust the command as necessary if you are using another directory.
(It might be possible to speed this up by also using the /D:m-d-y switch, but this should not take too long anyway.)
After doing this, copy the C:\PLDstructure folder (or whatever you named it) out of your VM and into your host operating system. We need it backed up outside the VM, because we are just about to…
Step 8: Apply the checkpoint you took in Step #4
Something might have gotten screwed up on your dev/onebox by doing this. SCDPBundleInstall can’t be trusted. Let’s be safe and apply our checkpoint, restoring our box to the healthy state before we ran it.
Step 9: Restore the needed folder structure
Copy the C:\PLDstructure (or whatever you named it) back into your VM.
Now create whatever empty folders you need in your packages directory by doing this (adjust the locations as necessary):
xcopy "C:\PLDstructure" "C:\AOSService\PackagesLocalDirectory" /T /E /X /I /H
Part III: Back on track!
We are now at a place where we can mostly return to following the wiki.
Mostly.
Step 10: Do SCDPBundleInstall -prepare
This may take a couple of minutes, but nearly as long as the -install. Remember the different syntax for -tfsprojecturi. You are pretty much using the same command that you used in Step #5, other than replacing -install with -prepare.
Although the -prepare probably failed before, it hopefully works now that the directory structure it needs exists. If not… you might be beyond the help I can give.
Step 11: Check in the touched files
All the files you see in Pending Changes > Included Changes should be files that currently exist but will be changed by running the actual install. They should not have been changed, just “touched” so that they are picked up as pending changes for version control. (There are less of them than what the -install will create since you are just getting the pre-existing files. -install will create all new files, but we don’t need them in the checkpoint we are creating, since rolling back to it in an emergency should delete files that did not exist.)
You now want to check all these in, with a clear note that this changeset is your pre-hotfix rollback point. If things go south, we can theoretically roll back to this point to get our VM back to a good state.
Make sure to merge your dev/working branch into your main/production/build branch so you have somewhere to fall back there, too. Watch the changesets; I got some false matches of older ones.
You might want to run a build in Lifecycle Services at this point, just to make sure nothing unexpected broke. Theoretically, there is nothing new being introduced, and you should have no problems. But that requires more trust of SCDPBundleInstall than I have.
Step 11: Do SCDPBundleInstall -install (again)
Once again, you might need to run it multiple times, if dependencies and/or run orders aren’t right.
This will take a while, especially if you have multiple branches mapped. Note my earlier advice that you (at least temporarily) remove mappings for anything but your dev/working branch.
Step 12: Review “Pending Changes”
Take a look at your Pending Changes. If you have multiple branches mapped, you might have redundancies you need to clean up by excluding/undoing them. Ideally, you see a nice clean set of hotfix changes, all contained in your packages directory (i.e. C:\AOSService\PackagesLocalDirectory).
Step 13: Resolve Conflicts
This is covered pretty well in the original wiki:
Step 14: Do a local build
Before doing this, refresh the list of models, so any new models are picked up by your build! Go to Dynamics 365 > Model Management > Refresh Models.
Do a local build. I usually just include all models at this point; be sure to “Synchronize Database” under Options, too! Because the build’s analysis of dependencies isn’t perfect, you might get build errors that resolve themselves if you do the build one or two more times. I ended up running the local build four or five times; as long as you are getting different errors each time, it means you’re making progress. (If you have a deeper understanding of this than me, please let me know, and I’ll add detail.) Eventually, you should hit a point where it builds without error, and all you get are the 1000+ warnings you are used to ignoring with every build.
If you keep getting the exact same errors over and over, you are outside the scope of help I can offer in this blog post.
Step 15: Check in, Synchronize, Deploy
The original wiki picks up fine at this point:
It may go without saying, but you should be sure to use check-in comments and deployable package names that are clear about their contents. I try to include at least the date, number of hotfixes, and the text “X++ Hotfixes,” or something similar. If you have a small enough set of hotfixes, actually including the hotfix number(s) makes sense!

A very powerful article. Thank you! I also ran into big problems with similar issues (SCDPBundleInstall working not as described, unable to remove installed fixes, etc.). M$ could have done much more better work to improve their manuals. C’mon, installing hotfixes should be a smooth process, not a rocket science!
Now I’m reading this article hope to avoid such problems in future.
LikeLike
Diman, thank you very much for taking the time to comment. I appreciate it.
If possible, I would not use SCDPBundleInstall anymore. Ignore this blog post if you can.
Linked at the top are two newer blog posts: Installing Application X++ Updates Still Sucks (part one and part two). It is still a hassle, but it is easier now with GUI tools. And although I do not explain it simply (there are still a lot of words), I hope I make the process clearer, in case you wonder WHY you have to do some of the things you do.
LikeLike
Reason why I started to go into details of this article, because I experienced issues with GUI tools, too. So I decided it would be “closer to mechanics” to use SCDPBundleInstall. As you suggest, I’ll try to focus on GUI tool then and read other two articles you wrote on this topic.
Thank you for your effort sharing your experience.
LikeLike
The two new blog posts also discuss the command line option, so they might help you see “this is what the GUI is doing.” I do appreciate your feedback, so if anything can be improved or made clearer, let me know.
I’m sorry you had issues… obviously, I had a lot of issues too!
LikeLike