
(last updated 2018-06-11)
Microsoft expects all Dynamics 365 / X++ development to be done in a preconfigured virtual machine (sometimes called a “onebox”) that has local installs of Visual Studio, Dynamics, and SQL Server; these are integrated in a way to ease development. They would prefer that you rented these VMs from them, which has some integration advantages; but it is possible to set up your own, which is probably less expensive in the long run, and might be more convenient. These instructions will help you set up that development environment on a personal machine; although there are a few wiki pages on it, there does not seem to be any complete, up-to-date information gathered in one place.
As with all my blog posts, if you have comments or additional information, I will endeavor to update what I have written here. I have noticed that this is by far my most popular blog post, so please, contirbute if you can… you’ll be helping many others!
This guide is up-to-date for the application release 7.3 platform update 12 version. Sometimes things change slightly between versions, but it is now rare to find drastic changes.
Prerequisites
Hardware
You probably want at least 16 GB of memory to SPARE for the VM beyond what you are already using, plus, probably around 150-200 GB of HD space. (By default the VM wants to offer you 128 GB on the virtual drive; but more room for a realistic database or checkpoints is good to have.) At least two CPUs. (As always, the more resources, the better; these are pretty good minimums.) And you have to be able to enable virtualization in the BIOS; many modern high-end machines enable it by default, but some might have it disabled, and older or less powerful machines might not support it..
You need to be able to run virtual machines on your computer
Not all machines can handle virtualization (it usually requires a BIOS setting that might not be enabled by default) and you probably need Windows 10 Professional or Enterprise (64 bit) as your operating system. I’m not sure that any other Windows operating systems other than Server ones will run Hyper-V. (You might be able to set it up with another OS entirely? Like, can Mac users run a Windows VM?)
Setting up Hyper-V on Windows 10 is covered here (consider installing Hyper-V a prerequisite): https://blogs.technet.microsoft.com/canitpro/2015/09/08/step-by-step-enabling-hyper-v-for-use-on-windows-10/
You need to have an MSDN account attached to a Visual Studio subscription
Your MSDN account might use the same email address as your “work/school” account, but they are different accounts in different Microsoft databases, and yes it can be confusing; but they can be linked together after you create the MSDN account.
NOTE: I believe the following information is deprecated, but I am temporarily leaving it here (struck through) until I am sure. Feedback from people having trouble setting up MSDN is welcome. Based on personal experience, I recommend using different passwords, so you can keep straight which one you are using at any given time. Go to https://developer.microsoft.com/registration to create an MSDN account. Although counterintuitive, you probably must create it as an “individual” account (instead of a “work/school” account) because you probably already have a “work/school” account for your work email address.
At least, that was the situation I ran into, and web searches lead me to realize I was far from alone. If you have been able to set this all up with a single account, let me know.
Downloading the VM
This can be tricky. Microsoft isn’t keen on putting these in the hands of people who want to learn the product; only paying customers and partners. If you know of a location where people who just want to learn how to program in X++ can get the VM, let me know. (I get asked a lot.)
The location at which you should download the VHDs has changed four times over the past year or so, but I think it’s finally somewhere it will stay: the “Shared asset library” in Lifecycle Services. Introducing you to Lifecycle Services is outside the scope of this post, but if you are a paying customer or partner, you should become very familiar with it pretty quickly.
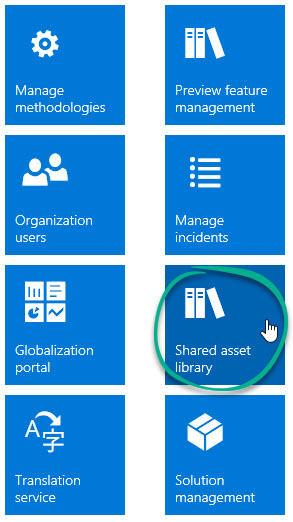
Don’t confuse the “Shared asset library” with your project-specific “asset library.” To get to the “Shared asset library,” after logging in (but before clicking on your project), look at the eight blue tiles on the right side of the screen (to the right of the “Announcements”).
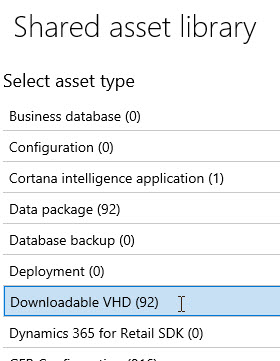
In the Shared asset library, click on the “Downloadable VHD” section.
Find and download all the parts of the VHD you want. For example, if you want application version 7.3 with platform update 12:
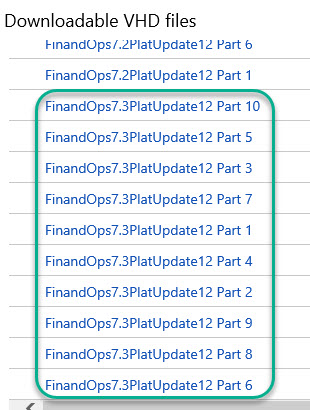
Once you have downloaded them all, one of the files should be an executable that assembles the others into a complete VHD file.
Installing the VM
You should have Hyper-V set up, per the prerequisites. Use Hyper-V Manager to set up your new VM.
You probably want to copy the VHD file into C:\Users\Public\Documents\Hyper-V\Virtual hard disks locally; that’s the default location Hyper-V wants. (It can go other places; you’ll just have to configure it properly.)
The VHD file is in the wrong format to import as a VM, so you have to create a new machine, then during the phase to create or connect a disk point to the VHD file.
In Hyper-V Manager (you are going to get very familiar with Hyper-V Manager), do not choose Import Virtual Machine; instead, choose New > Virtual Machine…
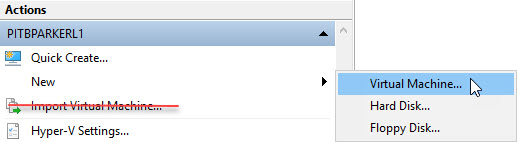
…and use the wizard:
- Specify Name and Location: You might have more than one VM set up at a time when transitioning to new updates, so consider including the version number in the name. You can change this later so don’t sweat it too much.
- Specify Generation: You need to set it up as a “Generation 1” machine.
- Assign Memory: I usually give it 18 GB (18,432 MB) out of the 32 GB on my laptop, and definitely Dynamic Memory, but you might want to experiment with this.
- Configure Networking: Start by choosing whatever connection you are currently using, but we’ll configure any others later.
- Connect Virtual Hard Disk: “Use an existing virtual hard disk” and specify the VHD you downloaded.
Configuring the VM
After initial setup, you can change settings on the virtual machine. (Not while it is started, though.) Highlight it in Hyper-V Manager and choose “Settings.”
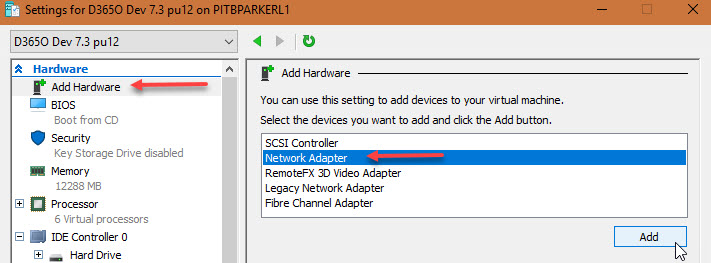
- If you switch between multiple wired and/or wireless network connections on your laptop, you want to “Add Hardware” and add any Network Adapter you’ll use with the VM. I haven’t used any of the advanced settings. (Be careful not to just overwrite your old network adapter instead of creating a new one.)
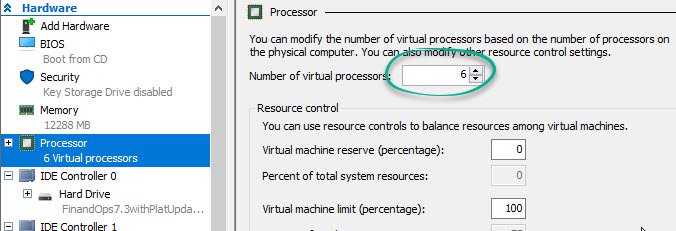
- You probably want to let it use more than one (1) virtual processor; not more than your hardware has, but at least two (2) will help performance. (I have eight (8) processors and give the VM six (6), but you might want to experiment with this.)
- Obviously, give it a useful name. You might have more than one set up at a time when transitioning to new updates, so consider including the version number in the name to distinguish them.
If you know that you are going to need extra space (for example, you expect to restore a production database that has grown somewhat), then now is a good time to proactively expand the size of the virtual hard drive, before possibly checkpointing and continuing.
Post-VM-installation configuration
Before you do any of this, you might want to checkpoint the VM. If the download process is long and slow, you don’t want to repeat it if you accidentally make a mistake you can’t undo.
When you first try to connect (and later, if you choose View > Enhanced Settings from the Virtual Machine Connection window) you can set display resolution and whether to use multiple monitors; also whether local resources (clipboard, printers, drives) are available to the VM. This is personal preference, but I find it easiest to work in a full screen single monitor, with access to the clipboard and local drive. Just be ready to set up what you want.
Logging in: Once you can launch the VM, you have to log in with Administrator / pass@word1 as the credentials.
Rename VM
This step is optional if you are the only developer; but if you are sharing VSTS with other developers, it seems to be necessary. Otherwise, you end up with Workspace collisions when trying to map source control.
If you get an error that looks like “The working folder C:\AOSService\PackagesLocalDierctory is already in use by workspace MININT-MHQ9O7x;DeveloperName on computer MININT-MHQ9O7x” when trying to do the “Source Control” steps below, you probably need to do this.
- Go to Control Panel > System and Security > System and click “Change settings” next to the computer name.
- Change it to a name of fifteen (15) characters or less; I suggest a standard that includes your name and the version (i.e. BPARKER-71-PU7 or BPARKER-73-PU12 would be fine). We just want to avoid the same name being used twice. Do not change the Workgroup or Domain. This will require rebooting the VM.
- Change SQL Server Reporting Services to use the same name. Launch “Reporting Services Configuration Manager” from the Start menu.
- Make sure the “Server Name” matches your new name and click “Connect.”
- Select “Database.” If the SQL Server Name does not match your new name, choose “Change Database” and run through the Wizard. (Nothing else should change; Report Server Database should remain as DynamicsAxReportServer.)
- Select “Web Portal URL” and make sure the URL matches the new name.
- Select “Web Service URL” and make sure the URL matches the new name. You can probably click through to verify that it is running.
- If you’ve already set up Workspace mapping in Visual Studio, you probably need to change it.
Provision Admin User
Once you can log in as Administrator, you need to use the AdminUserProvisioning tool (should be a shortcut on the desktop) to link the VM Administrator account to your MSDN account. All kinds of stuff in Visual Studio and the Dynamics AX/365 web interface depends on you being recognized as your Microsoft account. If the shortcut isn’t on the desktop (it wasn’t in early releases), go straight to: C:\AOSService\PackagesLocalDirectory\Bin\AdminUserProvisioning.exe
Be aware that there is a bug in the Platform Update 12 VMs; if you are still on a release using that, you need to work around it at this point: https://fix.lcs.dynamics.com/Issue/Details/1176973?kb=4089649
Where I work, we don’t use the Retail module, so I ignore the RetailTenantUpdateTool (delete it from the desktop, even). If you use it and have information to share on it, let me know.
Operating System
If you want sound, you might want to launch Services and set “Windows Audio” to Automatic startup. They seem to leave it as Manual on the VM with the assumption that you don’t want it. (Even if you chose sound in Enhanced Settings.) Then set whatever Windows sound scheme will help you.
Do whatever other OS configuration makes you comfortable. You can usually run “Settings,” search “For developers settings,” and easily mass-apply some useful settings there.
If you are as fussy as me (or like efficiency), you might want to put together your own checklist. For example, some things I like to do:
- Install the updated version of SQL Server Management Studio (SSMS), if you’re the kind of developer who dips into SQL Server frequently.
- Show file name extensions in Windows Explorer.
- Create a desktop shortcut for Visual Studio with “Run as administrator” set.
- Create a desktop shortcut for an Administrator Command Prompt with “Start in:” set to C:\AOSService\PackagesLocalDirectory\Bin and the Layout size increased a bit; I have to fire that up to run ModelUtil pretty frequently.
- For the same reason (running ModelUtil), I like to take a minute to install “Path Copy Copy.”
- Set your time zone, if needed.
- You might want to change the Administrator password.
- As of platform update 5, you are getting wallpaper instead of a plain grey desktop background. Your aesthetics are up to you.
The OS will probably need to download and install some Windows Updates; be ready for that.
Visual Studio
As of this writing, Visual Studio needs to “Run As Administrator,” so you might want to set up a shortcut for that.
You seem to need to log in to Visual Studio with your “Work/School” account rather than your “personal” (MSDN) account. You’ll need to configure workspaces and get from source control, which is out of the scope of this document. (If you don’t already understand source control as well as or better than me, then you need help I can’t give you.)
You should also review these (out-of-date and obviously woefully incomplete) setup steps from the Microsoft managed Wiki: https://docs.microsoft.com/en-us/dynamics365/unified-operations/dev-itpro/dev-tools/configure-developer-vm
NOTE: Some of these are now set as advised in advance. I have no idea if Intellitrace still exists. (You’re told to disable it but I can’t find it anymore.) I will probably remove the above link eventually, since it is increasingly out of date.
In Visual Studio, go to Tools > Options > Dynamics 365 > Projects and select “Synchronize database on build for newly created project.” It will make your life easier. Based on my experience, I haven’t figured out a reason you would NOT want this activated for your development projects. I also use “Organize projects by element type” and recommend it as a standard for complex projects.
If you are aesthetically minded, you can install additional Visual Studio color themes with this: https://marketplace.visualstudio.com/items?itemName=VisualStudioProductTeam.VisualStudio2015ColorThemeEditor
You might want to install other Visual Studio add-ons. There are tons, but I haven’t found any specific to X++ development; mostly they would just offer aesthetic tweaks.
Source Control
I am not an expert on source control, and it can be complicated. (It possibly justifies its own separate blog post.) First you’ll need to connect to and log in to your VSTS server.
You are going to need to edit your Workspace. (Don’t rename it; that will mess some things up with IIS/Reporting Services. Instead, follow the “Rename VM” steps above if you need to share source control with other developers.) Just do this:
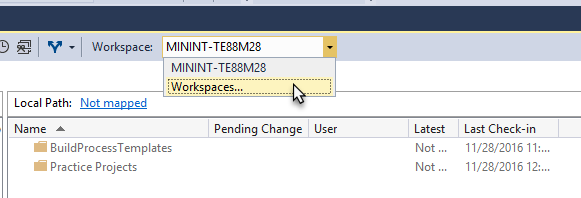
…and map certain parts of your projects to C:\AOSService\PackagesLocalDirectory (obviously this is only if you have existing projects):

Different companies will have different source control setups, so, DO NOT FOLLOW THIS BLINDLY.
Why do you need to do this?… When you create some objects, they are created right in your default folder. However, to let the “onebox” environment work its integration magic with the local Dynamics install, some objects you create in Visual Studio will instead be created in the C:\AOSService\PackagesLocalDirectory directory. In order for source control to see them, this mapping needs to exist for it to look in the right directories.
This configuration will differ depending on how you set up your source control. You might only need a single line added, and you might map it to a different “SourceControlFolder.” The important thing is making sure the objects created in C:\AOSService\PackagesLocalDirectory get in source control!
Do A Full Build
Especially if you have any existing code out there in source control already, now is a good time to get latest and do a full build of all models.
Dynamics 365 For Operations Local Install/Data
You might want to set an Internet Explorer favorites/bookmark for the local install of D365 (https://usnconeboxax1aos.cloud.onebox.dynamics.com). Although this seems like an internet URL, your “onebox” has a hosts file that will point that URL to 127.0.0.1 (your local machine) instead. You can find that file in C:\Windows\System32\drivers\etc if you’re curious, but you have no need to do anything with it.
A favorite/bookmark for VSTS and Lifecycle Services isn’t a terrible idea, either.
You probably want to go into the local installation of D365O, click the “cog” in the upper right for Settings, and change some User Options/Preferences. The USMF company has better test data, and you probably want to change the time zone. Again, this is personal preference.
There is a good chance that your organization has certain test accounts you will want to set up as Users (System administration > Users > Users) and/or Employees (Human resources > Workers > Employees). Or, perhaps you’ll have a database you want/need to restore that contains this info.
Configure SQL Server to let you log in
If you use SQL Server, you need to do this as of Platform Update 5:
https://brianjparker.tech.blog/2017/04/12/logging-in-to-sql-server-in-the-developer-vm/
Alternatively (and this is the better solution), you can still use Windows Authentication to connect to the local SQL Server if you run SSMS as administrator. So you might at least want to set up a shortcut for that, if you are the type who goes into SQL to debug problems.
Checkpoint the VM
After all this, if you accidentally do something wrong, you don’t want to have to do it all again. Checkpoint the VM. And don’t forget to do it regularly going forward.
Happy coding!

Brian, This was a huge help. I wasted hours before I found your missing steps. Thanks, Todd
LikeLiked by 1 person
Thanks for the comment. Makes it worth taking the time to set all that down. Good luck in your journey!
LikeLike
Very helpful article! Thank you!
LikeLiked by 1 person
Thanks for taking the time to comment; when you do a lot of writing, it is nice to know that somebody found it helpful! Best wishes to you.
LikeLike
I’m trying to install in my notebook, even though it doesn’t having enough memory hahaha Let’s see how the machine works!
LikeLike
Running Visual Studio inside a virtual machine is going to be a performance hog. Good luck, but don’t get optimistic!
LikeLike
Thank you!! I’ll post my feedback later!
And thank you too, for the post!
LikeLiked by 1 person
Hi everyone! Someone having problem to provision admin user? I’m having a ‘time out’ error, I followed all steps, the internet connection is working correctly. Someone can help me?
LikeLike
This is a personal blog, not a good format for help, especially with so few details. But I’ll show the comment in case somebody wants to suggest something.
LikeLike
Hi Brian,
I want to setup D365 operations for my individual learning and development on AZURE. AX 7 is not listed in my LCS project as my partner or company do not have licenses. In this case is there any possible for me to setup my own box ?
Any suggestions is much appreciated.
Thanks
Praveen
LikeLike
I’m sorry, Praveen; I don’t know what the situation is for people who are not partners, and I’ve never tried to set up a VM in Azure.
You are not likely to be able to access LCS, but you might still be able to download the VM and install it locally, if you have access to a powerful enough machine with Windows 10 Professional. It’s not a perfect learning environment, but it should be enough to develop your programming skills. If anybody else reads this comment and knows more, I hope they will share.
Frankly, Praveen, if you are just looking for something to learn, I think it is way easier (and there are more job opportunities) to learn a common language like Java.
LikeLike
Reblogged this on Dynamics Journal.
LikeLiked by 1 person
Great post Brian!!
LikeLiked by 1 person
Thank you, and thanks for the repost. This is by far my most popular blog post; I really found something that people want to do, but which isn’t covered well elsewhere.
LikeLiked by 1 person